
Contributed by Stacy Sweetser, ASCA & USMS Level II, SweetWater Swim Studio & Chris Brown, CSCS, CCET, Endurafit Training and Rehab
Swimming strong is about building athleticism that compliments the demands of moving through the water efficiently and powerfully. Dryland training, at the pool and at home, is a valuable addition to any swimmer’s routine regardless of age or fitness level. The goal of this series is to increase the swimmer’s range of motion while building strength and mobility. This fundamental movement pattern work aids in injury prevention, tightens connective tissue, and improves swim mechanics and strength.
The Swim Strong Series will present dryland exercises in progressive phases. Each phase builds upon the previous phase. The early phases will focus on range of motion, mobility and stability then progress into strength and resistive exercises.
Use the following Phase I exercise routine as your dynamic warm up before each swim, at home or before other activities. A dynamic warm up increases blood circulation and fires up muscles soon to be engaged in the water. Think, “RAMP Up!” before you start up. (RAMP = Range of motion, Activation, Muscle Pliability.)
Allow 3-5 minutes to complete this simple but effective routine at least 3x/week. On the pool deck, use a kickboard as a cushion for your knees, ankles, and forearms when appropriate.
Do not force movements in this routine and build repetitions and time in exercises gradually.
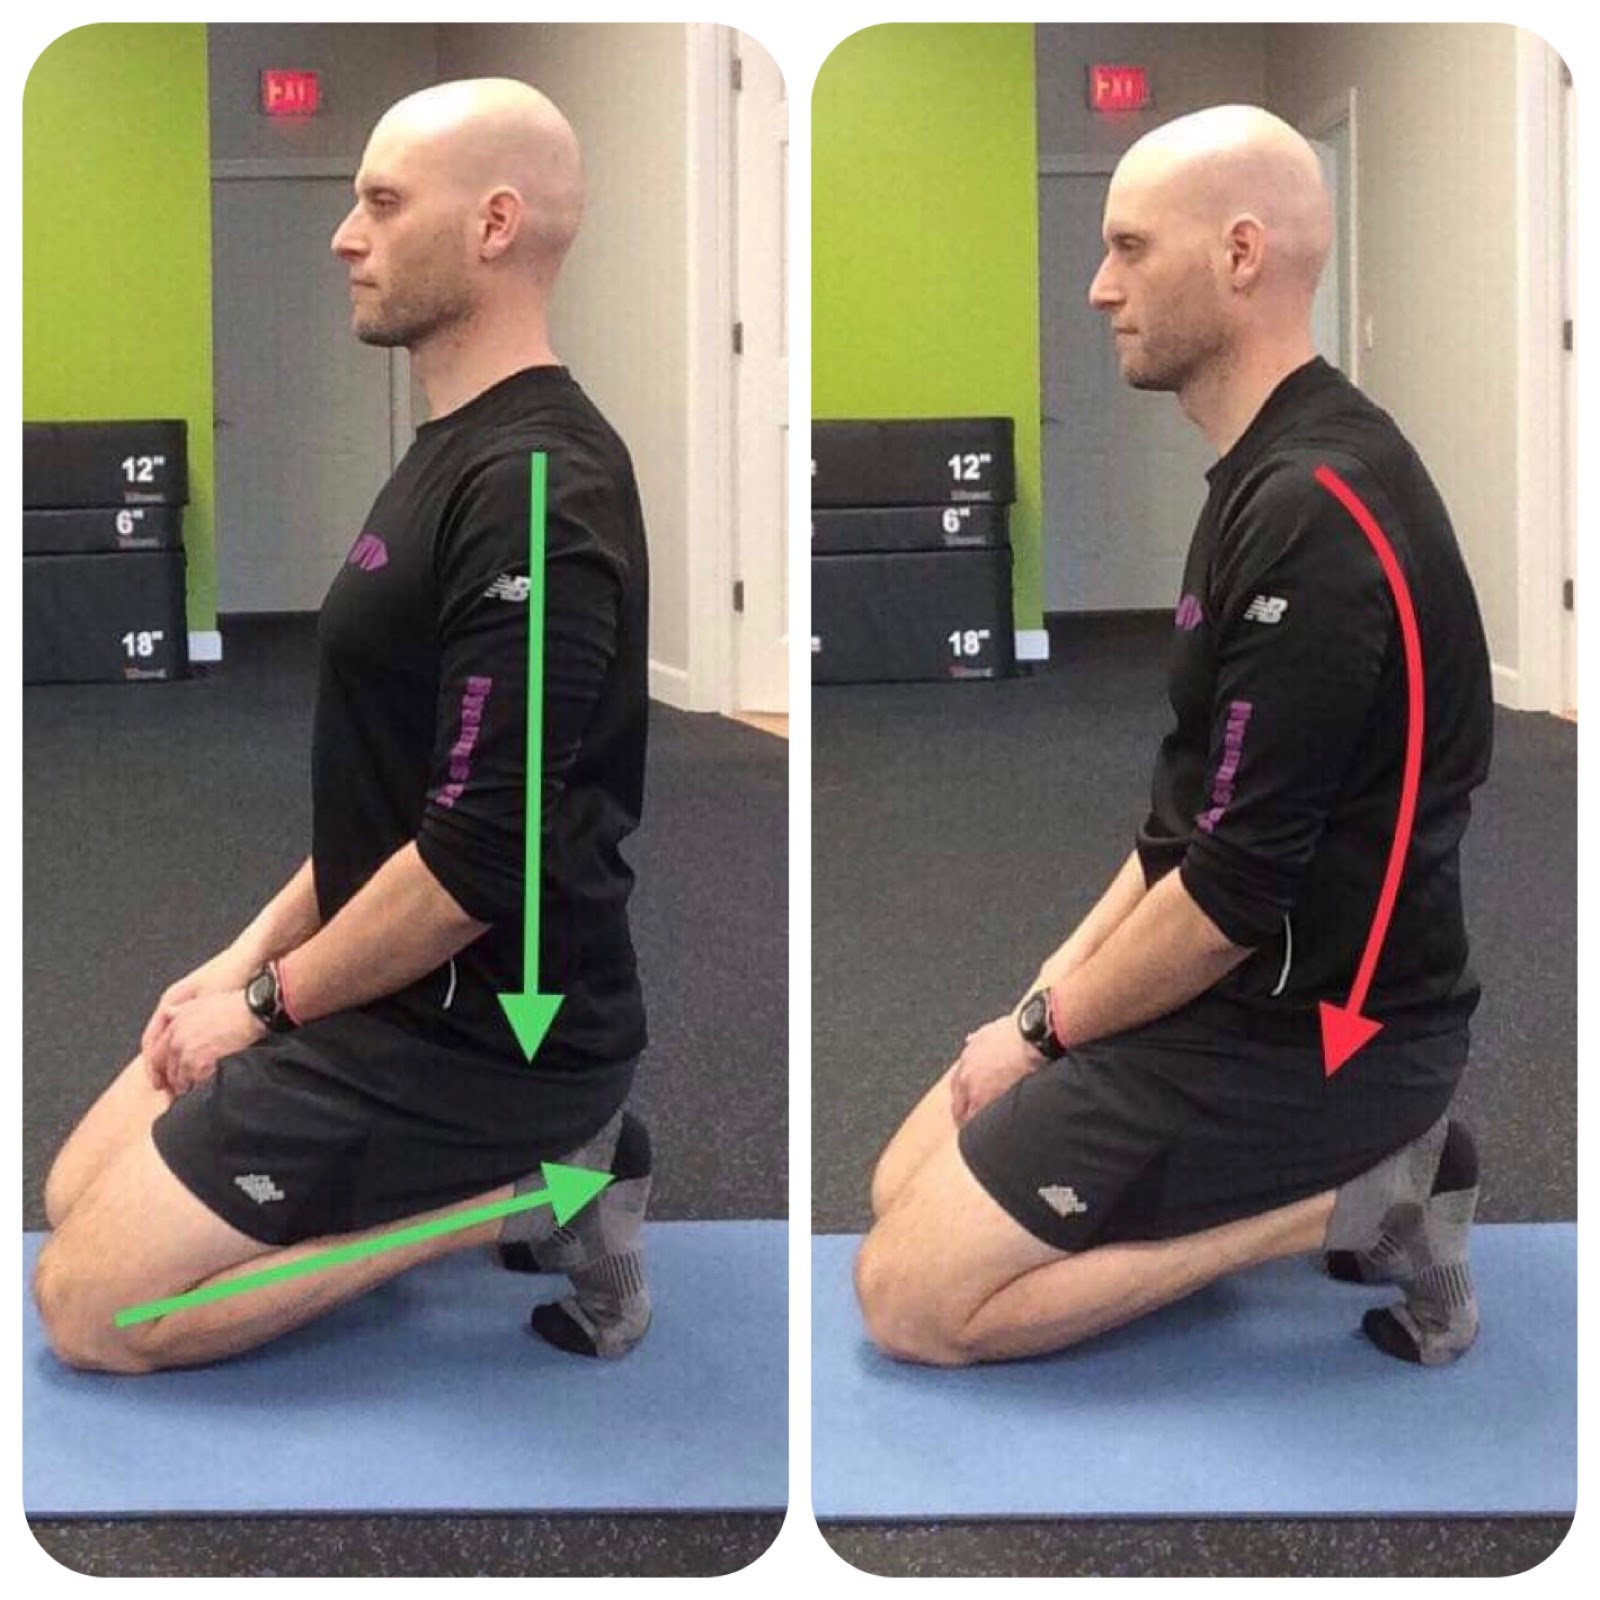
Posture Row
Why do it? The Posture Row teaches us how to engage our upper back and shoulders while keeping our spine in a “neutral” position. A neutral spine aids in a better overall body position in the water.
How to do it well: Standing with the feet hip width apart, knees flexed and hips back, make sure the head, neck and spine are in a “neutral” position as depicted by the green arrows below. Allow the fingertips to fall straight down to the floor, then draw the arms straight up towards the ceiling while squeezing the shoulder blades together. As you perform this motion, it is important that you remember to engage your core. One tip is to “zipper up the belly button” or, in other words, imagine trying to pull the zipper on your pants up with your belly button. Complete 12-15 repetitions.
Common mistakes: The most common mistakes most people make are 1) keeping the knees locked, 2) rounding the spine, and 3) not fully engaging the core. This will cause a “shrugging” motion instead of a pulling motion as depicted by the red arrows below.

Supported Hip Hinge
Why do it? The Supported Hip Hinge is a great drill which will help develop mobility of the shoulders and hips as well as flexibility of the hamstrings.
How to do it well: Standing with your hands on a wall (roughly shoulder height) take one step back from vertical with our feet hip width apart. Keeping your hands on the wall, slightly flex the knees as you press your hips back while “zippering up your belly button.” Your end range of motion should show a straight line from the wrist to the hips as depicted by the green arrows below. Complete 8-10 repetitions.
Common mistakes: The most common mistakes people make are 1) standing too close to the wall, 2) locking the knees, 3) rounding the spine, and 4) not fully engaging the core. This will cause a shortening of shoulder range of motion as well as the forehead dropping towards the floor.

Heel Sits / Toe Sits
Why do it? Ankle flexibility and mobility are crucial to swimmers both during the kick and push off of the wall. Heel Sits and Toe Sits are great drills to develop ankle and knee/quadriceps flexibility.
How to do it well: For Heel Sits, start in a quadruped position with your toes pointed back. Slowly lower your hips to your heels and sit in a tall position. For Toe Sits, start in a quadruped position with your toes pulled towards your shins. Slowly lower your hips towards your heels and sit in a tall position. Even though you are in a kneeling position, it is critical that your core is engaged, so, you guessed it... “Zipper up the belly button”. Take 8-10 deep breaths in each position.
Common mistakes: The common mistake most people make during both of these drills is allowing the shoulders to fall forward as depicted by the red arrows below. Remember to sit as tall as possible pulling the shoulder blades together and engage the core.

Plank
Why do it? The plank is the best “bang for your buck” drill. When done properly, it engages every muscle in the body, giving us a complete sense of core stability. Core stability is critical to hold a taut body line in the water.
How to do it well: Starting with the elbows directly under the shoulders and the toes in line with the ankles as depicted by the green arrows below, focus on engaging all areas of the body. Start by clenching the fists, then the biceps. Zipper up the belly button as you squeeze your glutes (“butt”). Now squeeze the thighs and pull the elbows down toward the toes. You should now feel the entire body working to stabilize. Hold 30-60 seconds.
Common mistakes: The common mistakes most people make during the plank are 1) allowing the hips to rise or fall out of neutral (as depicted by the red arrows below) and 2) not fully engaging the body during the exercise.

Learn more about Stacy & Chris:
Stacy Sweetser, ASCA & USMS Level II Coach: SweetWater Swim Studio | Facebook | Instagram
Chris Brown, CSCS, CCET: Endurafit Training and Rehab | Facebook | Instagram