Dryland

WW: Total Body Blast with Charlotte Brynn

This week’s Workout Wednesday is a live virtual workout! New England LMSC member and coach extraordinaire Charlotte Brynn of The Swimming Hole has been running virtual dryland workouts each morning. Check out tomorrow’s “Total Body Blast” from 9-9:45am ET on The Swimming Hole’s Facebook page or via Zoom (Meeting ID: 915 320 9712).

For tomorrow’s workout you'll need a set of dumbbells or 2 bricks/pieces of wood, plus one kettlebell or a brick. If you have a BOSU and want to intensify your abs have it ready!

If you join via Zoom, you can turn your camera on and see others doing the workout as well. If you can’t make it at 9, check out the Facebook Live recording later on. Get ready to sweat!

Links to the past several days of workouts:

Brynn_TotalBodyBlast.jpg

WW: Dryland ideas

With most swimmers in New England currently lacking pool access, this week’s Workout Wednesday features some dryland ideas for staying in shape out of the water. In addition to Bob’s workout suggestions, check out our Swim Strong series from 2019. You can find Phase 1, Phase 2, and Phase 3 on our website!

- Alana Aubin, NELMSC Communications Chair


by Bob Ouellette, NELMSC Coaches Chair

  1. Much like a swim workout, cardio activities like running or biking can be done as long steady aerobic workouts or as interval training (i.e. 3 mins @ 75%, then easy for 30 secs) to simulate the work/rest ratio of a swim workout.

  2. Yoga videos on YouTube are great activities for working the core. (Alana’s recommendation: Fightmaster Yoga or Yoga for Swimmers)

  3. I’m also a fan of stretch cords as they allow us to mimic the muscle patterns of various swim strokes.

  4. To work on the core/muscular system, perform circuits of the following exercises. Do 5-10 repetitions per exercise @ :30-:60 rest between each set. Do as many circuits as you like to create a 30-45 minute workout.

  • Burpees

  • Jump lunges

  • Planks

  • Sit ups or crunches

  • Pushups

  • Pullups

  • Squats

  • Jump rope

  • Flutter kicks


Keep an eye out for a new workout every Wednesday on our website and in our Facebook group. Then send us your favorite workout to share with the LMSC!

Swim Strong: Multiphase Dryland Series for Masters Swimmers, Phase III


Contributed by Stacy Sweetser, ASCA & USMS Level II, SweetWater Swim Studio & Chris Brown, CSCS, CCET, Endurafit Training and Rehab

Welcome back to our progressive dryland training sequence, Swim Strong. Now that you have progressed through Phases I & II, you are ready to introduce the use of resistance bands and add a challenge to the traditional side plank in Phase III. Read Phase I here and Phase II here.

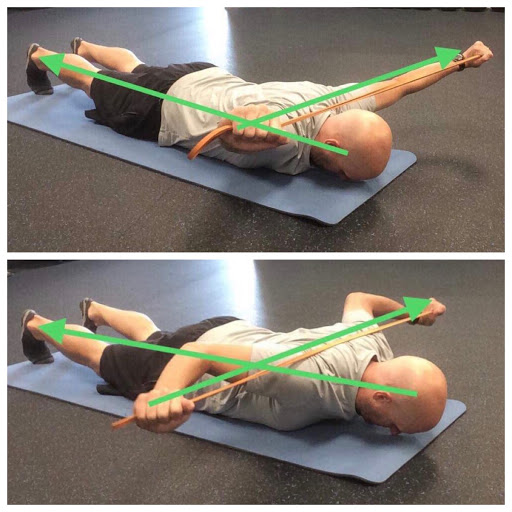
Resistance bands are simple training tools you can take with you anywhere (pack them in your swim bag!). Despite being simple, they are powerful tools that increase load on the muscles, tendons, and ligaments in addition to working range of motion. When using resistance bands, it is important to remember that form is the main priority, not working to failure. Due to the fact that the resistance intensifies as the band stretches, choose a band with a lighter resistance (we use ¼ - ½ inch for our clients). Here is a link to some of our favorites.

The goal of this series is to increase a swimmer’s range of motion while building strength, mobility and athleticism. This fundamental movement pattern work aids in injury prevention, tightens connective tissue, and improves swim mechanics and strength. Dryland training, at the pool and at home, is a valuable addition to any swimmer’s routine regardless of age or fitness level. 

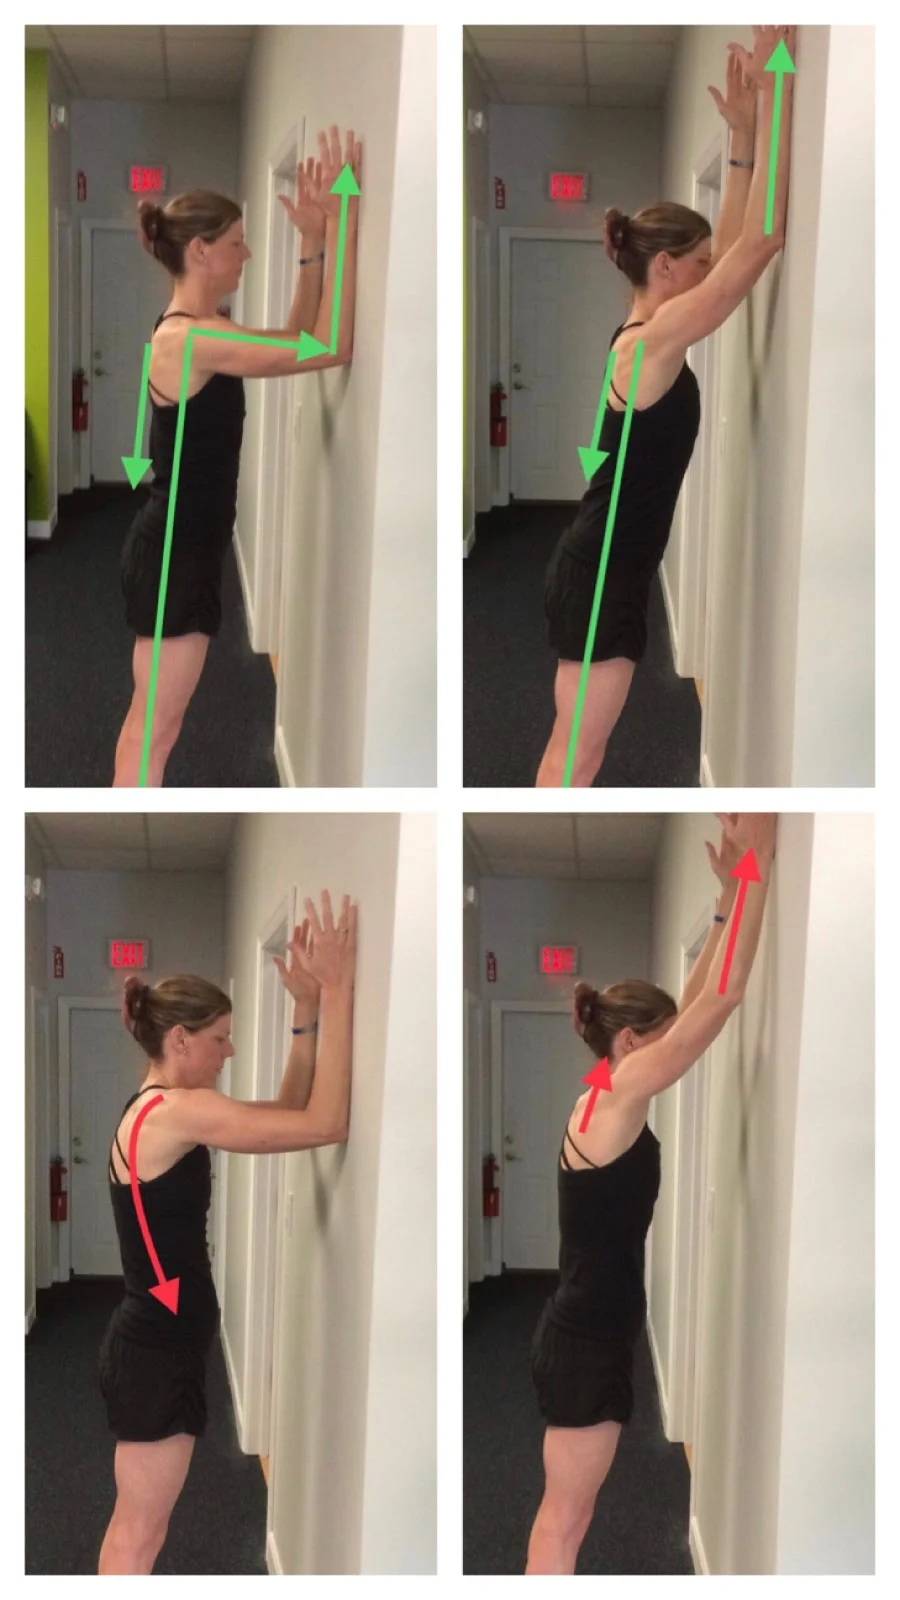
Use the following Phase III exercise routine as your dynamic warm up before each swim, at home, or before other activities. Allow 3-5 minutes 3x/week. Feel free to alternate days while revisiting exercises from Phase I and Phase II. On the pool deck, use a kickboard as a cushion for your knees, ankles, and forearms when appropriate.

A dynamic warm up increases blood circulation and fires up muscles soon to be engaged in the water. Think, “RAMP Up!” before you start up. (RAMP = Range of motion, Activation, Muscle Pliability.)

Do not force movements in this routine and build repetitions and time in exercises gradually. Remember, when using resistance bands, focus on form and do not work to failure.


Band Pull Aparts

Why do it? The band pull apart is a great drill to focus on strengthening the upper back and posterior (rear) shoulder. Think of these as the “posture muscles”. These groups are extremely important in allowing for shoulder mobility and helping to maintain a tall, neutral spine.

How to do it well: In a tall kneeling position (both knees on the ground), start by pulling the toes under the shins. Press the hips forward and raise the band to chest height with the palms facing upwards as depicted by the green arrows. Pull the band outward with the elbows remained in a straight (not locked) position. Complete 2-4 sets of 10-15 repetitions. Watch video example here.

Common mistakes: The most common mistakes are starting with the back rounded and the arms raised above the shoulders, extending or arching the back, and shrugging the shoulders during the pulling phase as depicted by the red arrows.

band pull aparts.jpg

Side Planks with Hip Dip

Why do it? The side plank with hip dip is a great drill to focus on the obliques, outer hip, and shoulders.

How to do it well: Start with the elbow directly under the shoulder and the feet in either a stacked position or heel to toe position with the hips in a neutral position. In a slow, controlled manner, draw the abs in and lift the hips towards the ceiling then return to the floor. Complete 2-4 sets of 8-12 repetitions. Watch video example here.

Common mistakes: The most common mistakes are starting with the hips too high, the elbow not aligned with the shoulder, and the shoulders rounded forward.

side planks.jpg

Bent Over Band Rows

Why do it? The band bent over rows is a great drill to improve the spine stabilizers and strengthen the upper and mid back.

How to do it well: Standing on the band with the feet hip width apart, slightly bend the knees, stick the butt back, and draw the shoulder blades together creating a strong, neutral spine. Pull the band upwards and imagine bringing the hands towards your pockets with the elbows straight up. Return the arms to a straight position. Complete 2-4 sets of 12-15 repetitions. Watch video example here.

Common mistakes: The most common mistakes are standing with the knees straight, rounding the spine, and allowing the elbows to pull outside.

band row good.jpg
band row bad.jpg

Superman Band Press

Why do it? The superman band press is a great drill to strengthen the posterior chain, including the paraspinal muscles, lats, posterior deltoid and rhomboids all while improving mobility of the shoulders.

How to do it well: Start by lying face down with the hands towards the end of the band with the palms facing down. Push the toes into the floor and extend the knees while pulling the band slightly higher than the head. Put tension on the band while pulling the band behind the head until the elbows reach the end point. Return the arms to a straight position while keeping tension on the band. Complete 2-4 sets of 8-15 repetitions. Watch video example here.

Common mistakes: The most common mistakes are extending the back and allowing the chest to leave the floor, pulling too much tension on the band, and not bending the elbows as the band comes behind the head.

around the world - good.jpg
superman band press bad.jpg

Learn more about Stacy & Chris:

Stacy Sweetser, ASCA & USMS Level II Coach: SweetWater Swim Studio | Facebook | Instagram
Chris Brown, CSCS, CCET: Endurafit Training and Rehab | Facebook | Instagram

Swim Strong: Multiphase Dryland Series for Masters Swimmers, Phase II


Contributed by Stacy Sweetser, ASCA & USMS Level II, SweetWater Swim Studio & Chris Brown, CSCS, CCET, Endurafit Training and Rehab

Welcome back to the Swim Strong Series. This is the second phase of a progressive dryland training sequence meant to build athleticism that compliments the demands of moving forward through the water efficiently and powerfully. Dryland training, at the pool and at home, is a valuable addition to any swimmer’s routine regardless of age or fitness level. Click here to read Phase I of the Swim Strong Series.

The goal of this series is to increase a swimmer’s range of motion while building strength and mobility. This fundamental movement pattern work aids in injury prevention, tightens connective tissue, and improves swim mechanics and strength. Each phase builds upon the previous phase. The early phases will focus on range of motion, mobility and stability, then progress into strength and resistance exercises.

Use the following Phase II exercise routine as your dynamic warm up before each swim, at home, or before other activities. Allow 3-5 minutes 3x/week. Feel free to alternate days while revisiting exercises from Phase I. If on the pool deck, use a kickboard as a cushion for your knees, ankles, and forearms when appropriate.

A dynamic warm up increases blood circulation and fires up muscles soon to be engaged in the water. Think, “RAMP Up!” before you start up. (RAMP = Range of motion, Activation, Muscle Pliability.)

Do not force movements in this routine and build repetitions and time in exercises gradually.


Wall Slides

wall slide.jpg

Why do it? Wall slides are a great drill to improve shoulder extension and lat activation.

How to do it well: Keeping the spine neutral, place the elbow, forearm and wrist on the wall with the elbow at shoulder height. Push the hands toward the ceiling, keeping the elbow and forearm in contact with the wall, while pulling the shoulder blades down as depicted by the green arrows. Complete 8-10 repetitions.

Common mistakes: The most common mistakes are rounding the spine, pulling the elbows away from the wall on extension, and shrugging the shoulders as depicted by the red arrows.

Chest Opener

Why do it? The chest opener is a great way to activate the posterior deltoid and rhomboids (think upper back) while stretching the pecs.

How to do it well: In a half kneeling position and with a neutral spine, place the hands around the ears with the elbows out to the side. Pull the elbows back while squeezing the shoulder blades together and exhaling. Complete 6-8 repetitions.

Common mistakes: The most common mistakes are starting with the elbows too far forward with a rounded spine and head tilted forward, arching the back during the pull back motion, and pointing the toes on the rear foot.

chest opener.jpg

T-Spine Rotations

Why do it? T-Spine Rotations are a great drill to provide mobility through the mid-back (thoracic spine).

How to do it well: In a half kneeling position, place the hands around the ears with the elbows out to the side (similar to the starting position of the chest openers). Take a deep breath in then exhale hard as you rotate over the front leg. Inhale and return to the starting position. Complete 6-8 repetitions.

Common mistakes: The most common mistakes are rounding the spine throughout the range of motion, not pulling the elbows back to engage the upper back, dropping the chin, and pointing the rear toes.

t-spine rotation.jpg


Ankle Mobs

Why do it? The Ankle Mobs (or Ankle Mobility) drill is one of our favorites for developing ankle mobility and flexibility in the gastrocnemius and soleus muscles (calf muscles).

How to do it well: Starting in the half kneeling position with the spine in neutral and the front foot slightly behind the front knee, place the hands on top of the knee. Shift your weight forward as you press the knee past the front toes while keeping the front heel in contact with the floor. Return to starting position. Complete 10-12 repetitions.

Common mistakes: The most common mistakes are extending the spine, starting with the front foot too far forward, and allowing the front heel to lose contact with the floor.

ankle mobs.jpg

Around the World

Why do it? The Around the World drill is a great movement to improve range of motion and flexibility of the rotator cuff.

How to do it well: Using a strap or a towel long enough to allow you to go through the range of motion, grab the end of the strap/towel with the palms facing down and the arms fully extended. Bring one arm overhead with the other out to the side to form a triangle. Bring both arms behind, then continue the motion to the other side. Repeat from the opposite side. Complete 4-6 repetitions.

Common mistakes: The most common mistakes are standing with the back extended (arched), using a strap or towel that is too short, and bending the elbows.

around the world - good.jpg
around the world - bad.jpg

Learn more about Stacy & Chris:

Stacy Sweetser, ASCA & USMS Level II Coach: SweetWater Swim Studio | Facebook | Instagram
Chris Brown, CSCS, CCET: Endurafit Training and Rehab | Facebook | Instagram

Swim Strong: Multiphase Dryland Series for Masters Swimmers, Phase I

Swim Strong: Multiphase Dryland Series for Masters Swimmers, Phase I

Swimming strong is about building athleticism that compliments the demands of moving through the water efficiently and powerfully. Dryland training, at the pool and at home, is a valuable addition to any swimmer’s routine regardless of age or fitness level. The goal of this series is to increase the swimmer’s range of motion while building strength and mobility. This fundamental movement pattern work aids in injury prevention, tightens connective tissue, and improves swim mechanics and strength.

The Swim Strong Series will present dryland exercises in progressive phases. Each phase builds upon the previous phase. The early phases will focus on range of motion, mobility and stability then progress into strength and resistive exercises.  Phase I teaches the following exercises: Posture Row, Supported Hip Hinge, Toe Sits, Heel Sits, and Plank.