dryland

Swim Strong: Multiphase Dryland Series for Masters Swimmers, Phase III


Contributed by Stacy Sweetser, ASCA & USMS Level II, SweetWater Swim Studio & Chris Brown, CSCS, CCET, Endurafit Training and Rehab

Welcome back to our progressive dryland training sequence, Swim Strong. Now that you have progressed through Phases I & II, you are ready to introduce the use of resistance bands and add a challenge to the traditional side plank in Phase III. Read Phase I here and Phase II here.

Resistance bands are simple training tools you can take with you anywhere (pack them in your swim bag!). Despite being simple, they are powerful tools that increase load on the muscles, tendons, and ligaments in addition to working range of motion. When using resistance bands, it is important to remember that form is the main priority, not working to failure. Due to the fact that the resistance intensifies as the band stretches, choose a band with a lighter resistance (we use ¼ - ½ inch for our clients). Here is a link to some of our favorites.

The goal of this series is to increase a swimmer’s range of motion while building strength, mobility and athleticism. This fundamental movement pattern work aids in injury prevention, tightens connective tissue, and improves swim mechanics and strength. Dryland training, at the pool and at home, is a valuable addition to any swimmer’s routine regardless of age or fitness level. 

Use the following Phase III exercise routine as your dynamic warm up before each swim, at home, or before other activities. Allow 3-5 minutes 3x/week. Feel free to alternate days while revisiting exercises from Phase I and Phase II. On the pool deck, use a kickboard as a cushion for your knees, ankles, and forearms when appropriate.

A dynamic warm up increases blood circulation and fires up muscles soon to be engaged in the water. Think, “RAMP Up!” before you start up. (RAMP = Range of motion, Activation, Muscle Pliability.)

Do not force movements in this routine and build repetitions and time in exercises gradually. Remember, when using resistance bands, focus on form and do not work to failure.
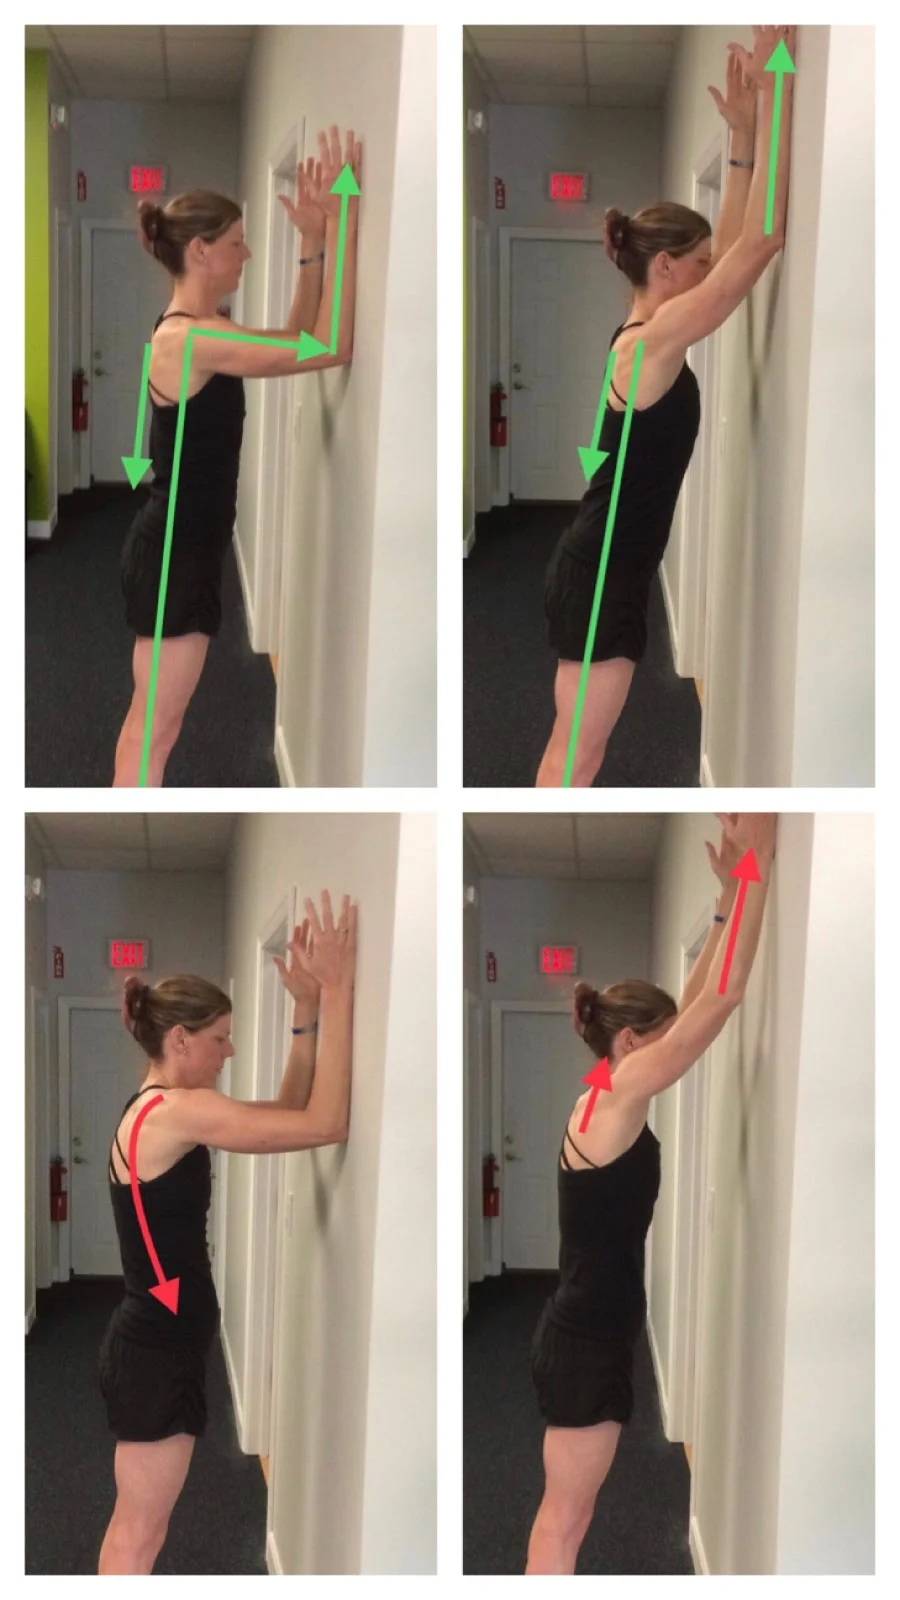

Band Pull Aparts

Why do it? The band pull apart is a great drill to focus on strengthening the upper back and posterior (rear) shoulder. Think of these as the “posture muscles”. These groups are extremely important in allowing for shoulder mobility and helping to maintain a tall, neutral spine.

How to do it well: In a tall kneeling position (both knees on the ground), start by pulling the toes under the shins. Press the hips forward and raise the band to chest height with the palms facing upwards as depicted by the green arrows. Pull the band outward with the elbows remained in a straight (not locked) position. Complete 2-4 sets of 10-15 repetitions. Watch video example here.

Common mistakes: The most common mistakes are starting with the back rounded and the arms raised above the shoulders, extending or arching the back, and shrugging the shoulders during the pulling phase as depicted by the red arrows.

band pull aparts.jpg

Side Planks with Hip Dip

Why do it? The side plank with hip dip is a great drill to focus on the obliques, outer hip, and shoulders.

How to do it well: Start with the elbow directly under the shoulder and the feet in either a stacked position or heel to toe position with the hips in a neutral position. In a slow, controlled manner, draw the abs in and lift the hips towards the ceiling then return to the floor. Complete 2-4 sets of 8-12 repetitions. Watch video example here.

Common mistakes: The most common mistakes are starting with the hips too high, the elbow not aligned with the shoulder, and the shoulders rounded forward.

side planks.jpg

Bent Over Band Rows

Why do it? The band bent over rows is a great drill to improve the spine stabilizers and strengthen the upper and mid back.

How to do it well: Standing on the band with the feet hip width apart, slightly bend the knees, stick the butt back, and draw the shoulder blades together creating a strong, neutral spine. Pull the band upwards and imagine bringing the hands towards your pockets with the elbows straight up. Return the arms to a straight position. Complete 2-4 sets of 12-15 repetitions. Watch video example here.

Common mistakes: The most common mistakes are standing with the knees straight, rounding the spine, and allowing the elbows to pull outside.
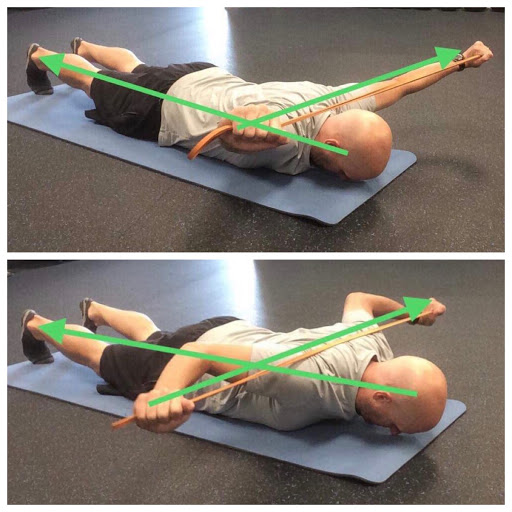
band row good.jpg
band row bad.jpg

Superman Band Press

Why do it? The superman band press is a great drill to strengthen the posterior chain, including the paraspinal muscles, lats, posterior deltoid and rhomboids all while improving mobility of the shoulders.

How to do it well: Start by lying face down with the hands towards the end of the band with the palms facing down. Push the toes into the floor and extend the knees while pulling the band slightly higher than the head. Put tension on the band while pulling the band behind the head until the elbows reach the end point. Return the arms to a straight position while keeping tension on the band. Complete 2-4 sets of 8-15 repetitions. Watch video example here.

Common mistakes: The most common mistakes are extending the back and allowing the chest to leave the floor, pulling too much tension on the band, and not bending the elbows as the band comes behind the head.

around the world - good.jpg
superman band press bad.jpg

Learn more about Stacy & Chris:

Stacy Sweetser, ASCA & USMS Level II Coach: SweetWater Swim Studio | Facebook | Instagram
Chris Brown, CSCS, CCET: Endurafit Training and Rehab | Facebook | Instagram

Swim Strong: Multiphase Dryland Series for Masters Swimmers, Phase II


Contributed by Stacy Sweetser, ASCA & USMS Level II, SweetWater Swim Studio & Chris Brown, CSCS, CCET, Endurafit Training and Rehab

Welcome back to the Swim Strong Series. This is the second phase of a progressive dryland training sequence meant to build athleticism that compliments the demands of moving forward through the water efficiently and powerfully. Dryland training, at the pool and at home, is a valuable addition to any swimmer’s routine regardless of age or fitness level. Click here to read Phase I of the Swim Strong Series.

The goal of this series is to increase a swimmer’s range of motion while building strength and mobility. This fundamental movement pattern work aids in injury prevention, tightens connective tissue, and improves swim mechanics and strength. Each phase builds upon the previous phase. The early phases will focus on range of motion, mobility and stability, then progress into strength and resistance exercises.

Use the following Phase II exercise routine as your dynamic warm up before each swim, at home, or before other activities. Allow 3-5 minutes 3x/week. Feel free to alternate days while revisiting exercises from Phase I. If on the pool deck, use a kickboard as a cushion for your knees, ankles, and forearms when appropriate.

A dynamic warm up increases blood circulation and fires up muscles soon to be engaged in the water. Think, “RAMP Up!” before you start up. (RAMP = Range of motion, Activation, Muscle Pliability.)

Do not force movements in this routine and build repetitions and time in exercises gradually.


Wall Slides

wall slide.jpg

Why do it? Wall slides are a great drill to improve shoulder extension and lat activation.

How to do it well: Keeping the spine neutral, place the elbow, forearm and wrist on the wall with the elbow at shoulder height. Push the hands toward the ceiling, keeping the elbow and forearm in contact with the wall, while pulling the shoulder blades down as depicted by the green arrows. Complete 8-10 repetitions.

Common mistakes: The most common mistakes are rounding the spine, pulling the elbows away from the wall on extension, and shrugging the shoulders as depicted by the red arrows.

Chest Opener

Why do it? The chest opener is a great way to activate the posterior deltoid and rhomboids (think upper back) while stretching the pecs.

How to do it well: In a half kneeling position and with a neutral spine, place the hands around the ears with the elbows out to the side. Pull the elbows back while squeezing the shoulder blades together and exhaling. Complete 6-8 repetitions.

Common mistakes: The most common mistakes are starting with the elbows too far forward with a rounded spine and head tilted forward, arching the back during the pull back motion, and pointing the toes on the rear foot.

chest opener.jpg

T-Spine Rotations

Why do it? T-Spine Rotations are a great drill to provide mobility through the mid-back (thoracic spine).

How to do it well: In a half kneeling position, place the hands around the ears with the elbows out to the side (similar to the starting position of the chest openers). Take a deep breath in then exhale hard as you rotate over the front leg. Inhale and return to the starting position. Complete 6-8 repetitions.

Common mistakes: The most common mistakes are rounding the spine throughout the range of motion, not pulling the elbows back to engage the upper back, dropping the chin, and pointing the rear toes.

t-spine rotation.jpg


Ankle Mobs

Why do it? The Ankle Mobs (or Ankle Mobility) drill is one of our favorites for developing ankle mobility and flexibility in the gastrocnemius and soleus muscles (calf muscles).

How to do it well: Starting in the half kneeling position with the spine in neutral and the front foot slightly behind the front knee, place the hands on top of the knee. Shift your weight forward as you press the knee past the front toes while keeping the front heel in contact with the floor. Return to starting position. Complete 10-12 repetitions.

Common mistakes: The most common mistakes are extending the spine, starting with the front foot too far forward, and allowing the front heel to lose contact with the floor.

ankle mobs.jpg

Around the World

Why do it? The Around the World drill is a great movement to improve range of motion and flexibility of the rotator cuff.

How to do it well: Using a strap or a towel long enough to allow you to go through the range of motion, grab the end of the strap/towel with the palms facing down and the arms fully extended. Bring one arm overhead with the other out to the side to form a triangle. Bring both arms behind, then continue the motion to the other side. Repeat from the opposite side. Complete 4-6 repetitions.

Common mistakes: The most common mistakes are standing with the back extended (arched), using a strap or towel that is too short, and bending the elbows.

around the world - good.jpg
around the world - bad.jpg

Learn more about Stacy & Chris:

Stacy Sweetser, ASCA & USMS Level II Coach: SweetWater Swim Studio | Facebook | Instagram
Chris Brown, CSCS, CCET: Endurafit Training and Rehab | Facebook | Instagram

Swim Strong: Multiphase Dryland Series for Masters Swimmers, Phase I

Swim Strong: Multiphase Dryland Series for Masters Swimmers, Phase I

Swimming strong is about building athleticism that compliments the demands of moving through the water efficiently and powerfully. Dryland training, at the pool and at home, is a valuable addition to any swimmer’s routine regardless of age or fitness level. The goal of this series is to increase the swimmer’s range of motion while building strength and mobility. This fundamental movement pattern work aids in injury prevention, tightens connective tissue, and improves swim mechanics and strength.

The Swim Strong Series will present dryland exercises in progressive phases. Each phase builds upon the previous phase. The early phases will focus on range of motion, mobility and stability then progress into strength and resistive exercises.  Phase I teaches the following exercises: Posture Row, Supported Hip Hinge, Toe Sits, Heel Sits, and Plank.

USMS National Coaches Clinic: 5 Key Takeaways from a Triathlete’s Perspective


Contributed by Stacy Sweetser, GSP & Coach of SWS Originally published on her blog, Simply Faster

Presenters: Jack Mcafee, Bo Hickey, Dr. Gary Hall Sr., Dr. Joel Stager, Coach Bruce Gemmell

Presenters: Jack Mcafee, Bo Hickey, Dr. Gary Hall Sr., Dr. Joel Stager, Coach Bruce Gemmell

After an intense two-day clinic filled with captivating speakers, a few Olympians, and a roaring crowd of USMS coaches with impressive backgrounds, my head was spinning with delight on my way home. How could I share what I learned? How can swimmers get faster right now with this information? 

I distilled the hours of lecture, demonstration and pool time down to “Five Key Takeaways.” Ultimately these take aways are real training habits swimmers and triathletes can implement THIS WEEK to become healthier, stronger and faster at any age.  


1) Dryland Warmup  

Shoulder Flexibility Testing

Shoulder Flexibility Testing

Bo Hickey, a Certified Strength & Conditioning Specialist, detailed the importance of a dynamic warm up before hitting the water. This aids in injury prevention and prepares the body before it is loaded in the water. Many runners have a standard pre-run warm up routine and swimming should be no different. Bo details a pre-swim dryland warmup via article and video here

Takeaway: Don’t skip the dryland warmup pre-swim.


2) Reduce Frontal Drag 

Plantar Flexion Exercise

Plantar Flexion Exercise

Olympian Dr. Gary Hall Sr. of The Race Club reminded us we are always moving forward in the water, which happens to be 800x more dense than air! Frontal drag is significant and we have to find ways to work through the water effectively. A very common yet fixable area of drag for many triathletes is toes pointed down or out to the side when swimming. Swimmers with biking and running backgrounds can have limited plantar flexion which can increase frontal drag up to 30%. Working ankle flexibility out of the water can save valuable time in the water. Dryland training can include sitting on ankles with toes pointed inward for :20 - 2:00 at a time daily. For more on ankle flexibility and dryland work from The Race Club, click here. 

Takeaway: Plantar flexibility is a critical piece to reducing frontal drag.


3) Interval Train 

Coach Bruce Gemmell shared great insight into his time coaching Katie Ledecky. In addition to working hard, setting goals and prioritizing self-care, swimmers must know their training zones/paces. Similar to training on the bike using Functional Threshold Power and running using VDOT values, swimmers should be aware of their various working paces (easy, aerobic, aerobic endurance, and anaerobic). Coach Gemmell uses the Jon Urbanchek color system with his swimmers. Each swimmer has detailed charts of their various paces in various work zones. There is an app for that! 

Takeaway: Interval train with specific paces. Perform a threshold test. 


4) Perform Tri Specific Skills in the Pool

Open Water Drafting and Buoy Turn Skills in the Pool

Open Water Drafting and Buoy Turn Skills in the Pool

Jack Mcafee, IMFL Male Winner 2016 and Helen Naylor, USMS National Coaches Committee Volunteer, reviewed opportunities to work open water skills in both the open water and pool throughout the season. These skills can easily be practiced in a pool if open water is not available. Pack swimming, drafting skills, treading water starts, sighting, etc. can be creatively practiced in pools. This video details various ways to draft in open water, and can be adapted for the pool with 2+ people in a lane. Various sighting skills shown here can be perfected in the pool before hitting the open water.  

Takeaway: Open water skills can be practiced in a pool. 


5) Refuel 

Recovery Drink or Quality Whole Foods 30-45min Post Workout

Recovery Drink or Quality Whole Foods 30-45min Post Workout

Joel Stager PhD., Indiana University, spoke of his recovery fuel study. After a pre season build, his swimmers were tired, sick and not improving despite solid training. He instituted a recovery fueling plan using chocolate milk within 45min post practice. The team bounced back into the season healthier and stronger than before. Read the formal study from IU on Chocolate Milk as a Post Exercise Recovery Aid. The body must be refueled shortly after working out to recover well. More information on nutrition secrets to improving fitness here.

Takeaway: Consume a recovery drink (and/or quality whole foods) within 30-45min of your workout.